Getting Started
The Ultimate Guide to Growing Cannabis for Beginners
Mar
The Ultimate Guide to Growing Cannabis for Beginners
Growing your own cannabis is an empowering experience that puts quality, control, and savings in your hands. Whether you’re looking to start a small personal grow or explore cultivation as a new hobby, this guide will walk you through the essentials from seed to harvest.
Step 1: Know Your Local Laws
Before you start growing, it’s important to understand the legal landscape.
Cannabis seeds can be legally sold across the United States because they are considered hemp seeds under federal law, so long as they contain less than 0.3% THC by dry weight. This classification allows seed banks like Seednest to ship seeds nationwide. However, what you’re allowed to do with those seeds depends entirely on your state laws.
Home cultivation is not legal everywhere. Some states allow adults to grow cannabis for personal use, while others restrict it to medical patients or ban it entirely. Even in states where it’s legal, there may be rules about how many plants you can grow, whether they need to be grown indoors, or how they must be secured.
We always recommend checking your local laws before planting. Reliable resources include NORML and your state’s official cannabis control board or department of health website. Understanding your rights and responsibilities is the first step to growing confidently and safely.
Step 2: Choose the Right Seeds
Not all cannabis seeds are the same, and selecting the right ones is key to a successful grow. Feminized seeds produce only female plants, ensuring that every plant grows buds, which makes them a reliable choice for growers who want to maximize yield without worrying about male plants.
There are two main types of cannabis seeds: autoflower and photoperiod.
-
Autoflower Seeds: These grow faster and don’t rely on light cycles to start flowering, making them beginner-friendly. They automatically transition from vegetative growth to flowering, usually within 3-4 weeks, regardless of light exposure. Autoflowers are typically smaller and finish growing in 8-12 weeks, making them great for discreet or fast harvests.
-
Photoperiod Seeds: These require a specific light schedule to transition into flowering. During the vegetative stage, photoperiod plants need at least 16–18 hours of light per day to stay in active growth. Indoors, growers maintain this light cycle until they’re ready to trigger flowering by switching to 12 hours on, 12 hours off. Outdoors, flowering is triggered naturally as daylight hours shorten with the seasons.
While they take longer to mature, photoperiod plants often produce larger yields and give growers more control over plant size and training techniques. They’re a great choice for those who want to shape their grow and extend the vegetative phase as needed.
Step 3: Decide Between Indoor and Outdoor Growing
Each method has its own advantages depending on your local regulations, space, climate, and goals. For beginners, indoor growing provides more control over the environment, while outdoor growing is a more cost-effective option that allows plants to grow naturally with minimal intervention.
-
Indoor Growing: Provides control over the environment, allowing for year-round cultivation. Requires grow lights, ventilation, and humidity management. Can be the best option for discreet growing.
-
Outdoor Growing: Uses natural sunlight, making it a low-maintenance and budget-friendly option. While the growing season is typically limited to the warmer months, cannabis thrives outdoors with little effort in many regions. Proper strain selection and natural soil amendments can help optimize outdoor grows in a variety of conditions.
Step 4: Setting Up Your Grow Space
A well-prepared grow space leads to healthier plants and better yields. Here’s some of what you’ll need to get started:
-
Containers: Fabric pots or plastic containers with drainage holes work best to promote strong root growth and prevent overwatering.
-
Soil: A nutrient-rich, well-draining soil mix with organic matter like compost or worm castings to support plant health.
-
Grow Lights (Indoor): LED or full-spectrum grow lights to mimic sunlight and promote strong vegetative and flowering growth.
-
Grow Tent (Indoor): A reflective, enclosed space that helps control light exposure, humidity, and temperature while keeping pests out.
-
Ventilation: Proper air circulation with fans and an exhaust system to maintain airflow, prevent mold, and remove excess heat.
-
Temperature & Humidity Control: Ideal temperatures range between 70-85°F (21-29°C) during the day with a 10°F (5°C) drop at night. Humidity should be adjusted depending on the growth stage, starting higher for seedlings and lowering during flowering.
Step 5: Germinating Your Seeds
One of the easiest methods for germination is the paper towel method, though some growers prefer the direct sow method, where seeds are planted directly into their final growing container to minimize transplant shock.
-
Place seeds between damp paper towels.
-
Keep in a warm, dark space.
-
Check daily and mist with water if needed.
-
Once the taproot emerges, plant the seed directly into soil.
Step 6: The Growth Stages of Cannabis
Seedling Stage (2-3 weeks)
-
Small leaves begin to form.
-
Keep light cycles at 18-24 hours per day.
-
Avoid overwatering, soil should be slightly moist, not soggy.
-
Autoflowers grow faster in this stage and transition to vegetative growth quickly, while photoperiods take longer to establish.
Vegetative Stage (3-8 weeks)
-
Plants grow taller and bushier.
-
Require more water and nutrients, particularly nitrogen.
-
Maintain temperatures around 70-85°F.
-
Photoperiod plants can stay in this stage indefinitely until switched to a 12/12 light cycle, whereas autoflowers move to flowering on their own, usually within 3-4 weeks.
Flowering Stage (6-12 weeks)
-
Buds start to form.
-
Reduce light exposure to 12 hours per day (for photoperiod plants) to simulate the shorter daylight hours of fall, which naturally triggers the plant’s flowering stage..
-
Shift nutrients to a low-nitrogen, high-phosphorus blend.
-
Autoflowers continue flowering under 18-24 hours of light and generally have a shorter flowering period of 6-9 weeks, while photoperiods may take 8-12 weeks depending on the strain.
Step 7: Harvesting, Drying, and Curing
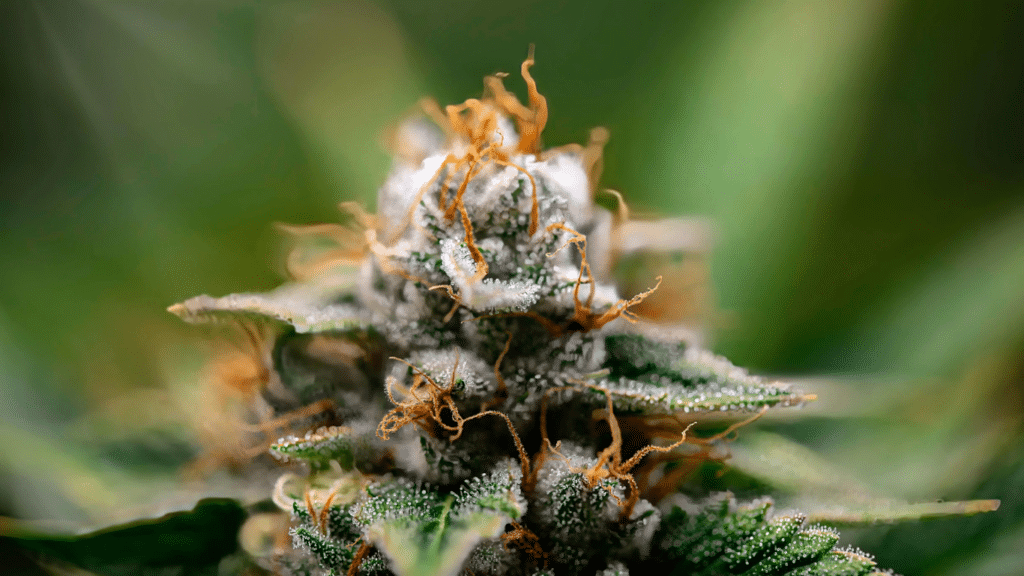
Knowing when to harvest is key to getting the best potency and flavor.
-
Trichome Test: Look at the trichomes (tiny crystals on buds). If they are mostly cloudy with some amber, it’s time to harvest.
-
Drying: Hang trimmed buds or the whole plabt in a dark, ventilated space with 50-60% humidity for 7-10 days.
-
Trimming: Before curing, trim off excess leaves to improve the smoothness and burn quality of the final product. Sugar leaves can be saved for making edibles or concentrates.
-
Curing: Store dried buds in glass jars, opening them daily to release moisture for at least 2-4 weeks, but the longer the better. Extended curing (up to several months) allows flavors and aromas to develop fully while improving smoothness and potency. Over time, moisture distributes evenly throughout the buds, preventing harshness and enhancing terpene profiles.
Final Thoughts
Growing cannabis at home doesn’t have to be complicated. By starting with quality feminized or autoflower seeds, maintaining a simple setup, and following these steps, you’ll be on your way to a successful harvest. Ready to start? Explore our premium selection of seeds at Seednest and grow your own, your way.